Using the apps control section
Leverage the Plurilock AI console to extend your security policy. The console offers admins control of both web applications and mobile.
Web:
To apply Web Policy ➔ Go To Apps Control ➔ Web
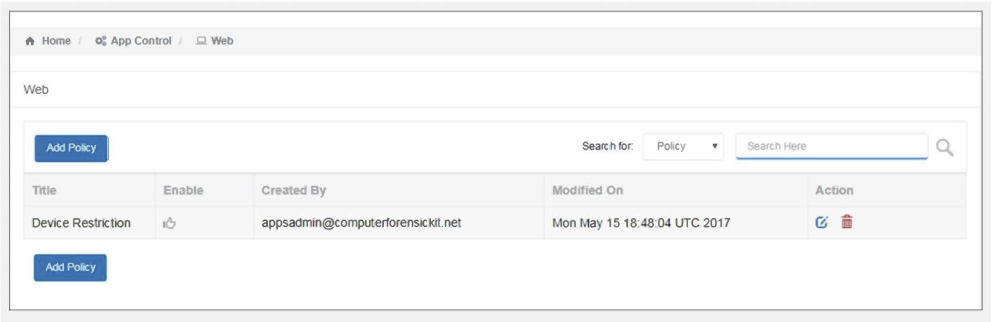
Click on ADD POLICY to get started with creation of the policy
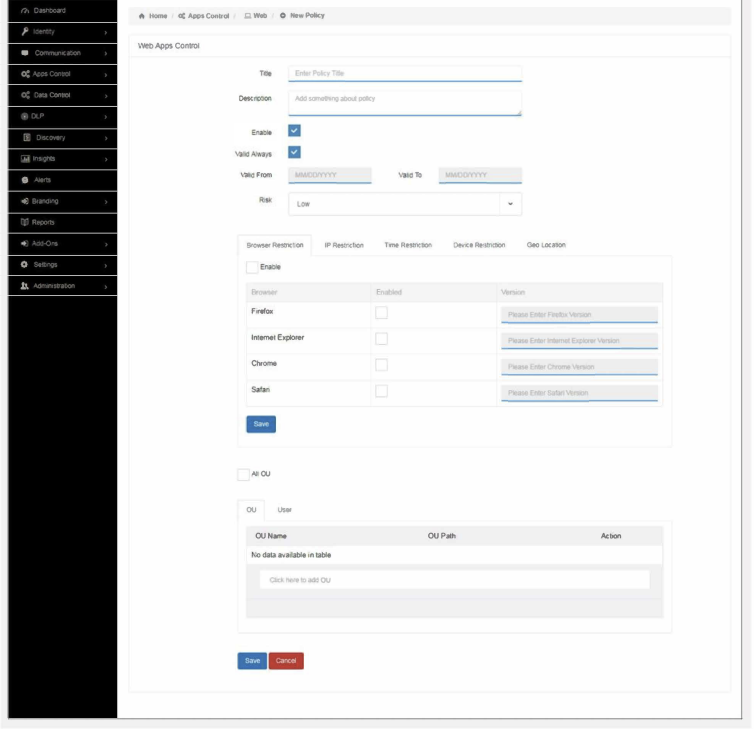
To create a new policy, fill in the policy details:
- Title: Name your policy identifies it later when you want to make changes quickly.
- Description: Short description to describe the policy (helpful for multiple admins).
- Enabled: If you want the policy to be disabled for some time or to re-enable it, you can check/uncheck “enabled” option as shown above.
- Valid Always: You can decide the validity of the policy with “validity always” button. Toggle if you want a policy for a stipulated time or a policy which is always applied.
- Valid From and Valid To: If “valid always” is off, then you will have to provide the date range the policy. This way the admin won’t need to manually turn off the policy.
- Risk: Select risk factor for policies according to the severity: high, medium, and low. This data is reflected on the dashboard in the “violation section”.
Click on SAVE to save the policy created
Browser Restriction:
In this policy:
- Browser restriction allows administrators to compel users to access their accounts only from a particular browser
- While configuring this feature, admins can select the browsers and the versions to be allowed
- Only one version per browser can be specified and the users using browser versions below the specified one would be blocked. Users using specified version and above would be allowed
- This policy can be applied to users as well as on OU’s
IP Restriction:
- Restrict a particular user or a group of users to access cloud-based apps only from specific IP address
- Import user & IP details in CSV format
- Export registered user & IP mappings
- Admins can create many user-based and OU-based IP restriction policies
- Add unlimited IPs & users in the policy
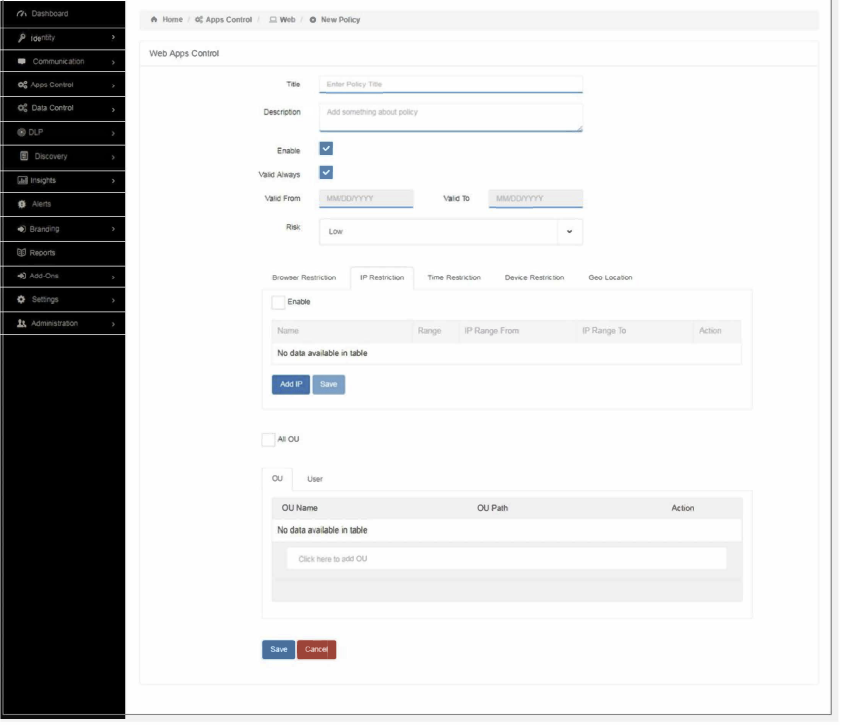
Click on ADD POLICY to get started with creation of the new policy or fill in the policy details
- Title: Name your policy to identify it later when you want to make changes quickly.
- Description: Short description of policy (helpful for multiple admins).
- Enabled: If you want the policy to be disabled for some time or to re-enable it, you can check/uncheck “enabled” option as shown above.
- Valid Always: You can decide the validity of the policy with “validity always” button. Toggle if you want a policy for a stipulated time or a policy which is always applied.
- Valid From and Valid To: If “valid always” is off, then you will have to provide the date range the policy. This way the admin won’t need to manually turn off the policy.
- Risk: Select risk factor for policies according to the severity: high, medium, and low. This data is reflected on the dashboard in the “violation section.” Click on SAVE to save the policy created.
The IP restriction policy will not apply for local IPs, it should be always be public IP (Static IP). If there is a use proxy for your organization, then the admin can put your proxy IP as well.
Note: At this point, the admin can set Proxy or Public IP setting on a domain level. Once this setting is applied all the policies have to follow the domain level setting.
We support Dynamic IP too, but we require arange of dynamic IP from internet service provide it.
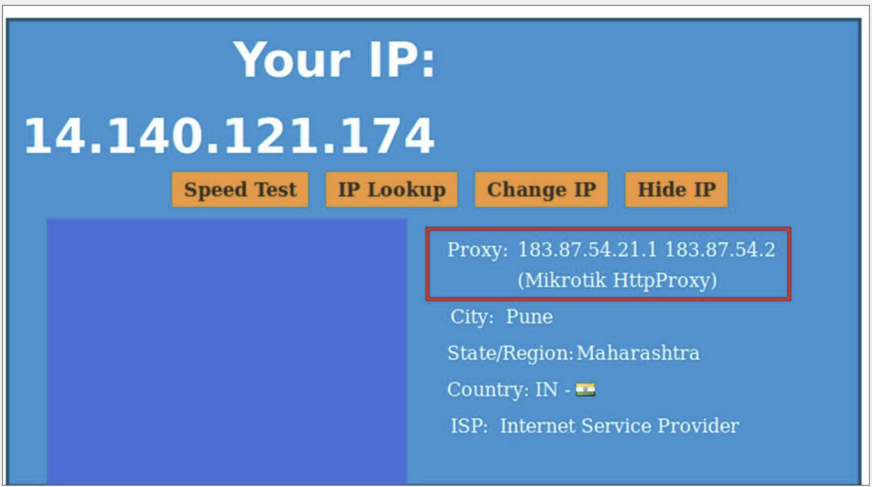
For your public IP address, give “my IP” in Google search, this will show your public IP address. ‘Refer the below screenshot.

For you proxy IP address go to www.whatismyip.com site, you will find the information as shown below
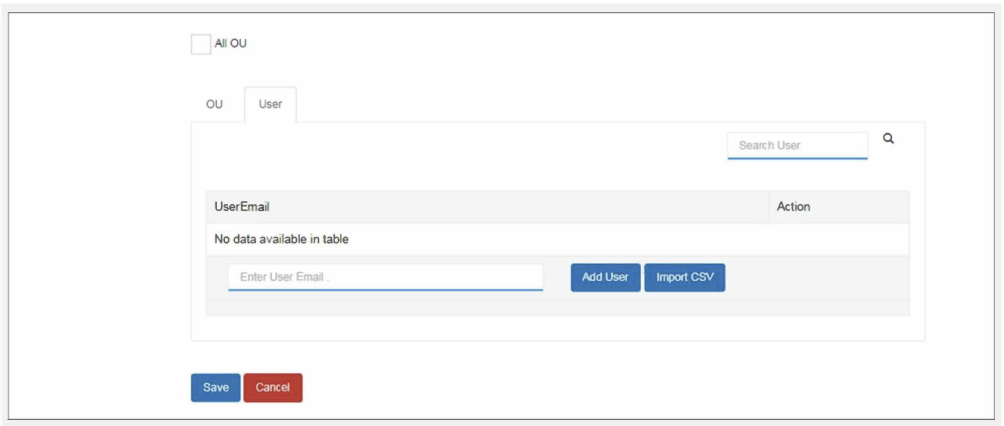
- You can add User ID & IP Address mapping manually or upload the csv by clicking on “add user” or “import CVS” button
- For OU-based IP restriction, admins can select the OU from the dropdown that are present Business apps
Time Restriction:
- Restrict a particular user or a group of users to access cloud-based apps during a specific time range
- Import user in CSV format
- Export registered users
- Admins can create many user based and OU based Time Restriction policies (users cannot be duplicated across policies)
- Add unlimited time range & users in the policy
Click on ADD POLICY to get started with creation of the new policy or fill in the policy details.
- Title: Name your policy to identify it later when you want to make changes quickly.
- Description: Short description to describe the policy (helpful for multiple admins).
- Enabled: If you want the policy to be disabled for some time or to re-enable it, you can check/uncheck “enabled” option as shown above.
- Valid Always: You can decide the validity of the policy with “validity always” button. Toggle if you want a policy for a stipulated time or a policy which is always applied.
- Valid From and Valid To: If “valid always” is off, then you will have to provide the date range the policy. This way the admin won’t need to manually turn off the policy.
- Risk: Select risk factor for policies according to the severity: high, medium, and low. This data is reflected on the dashboard in the “violation section.”

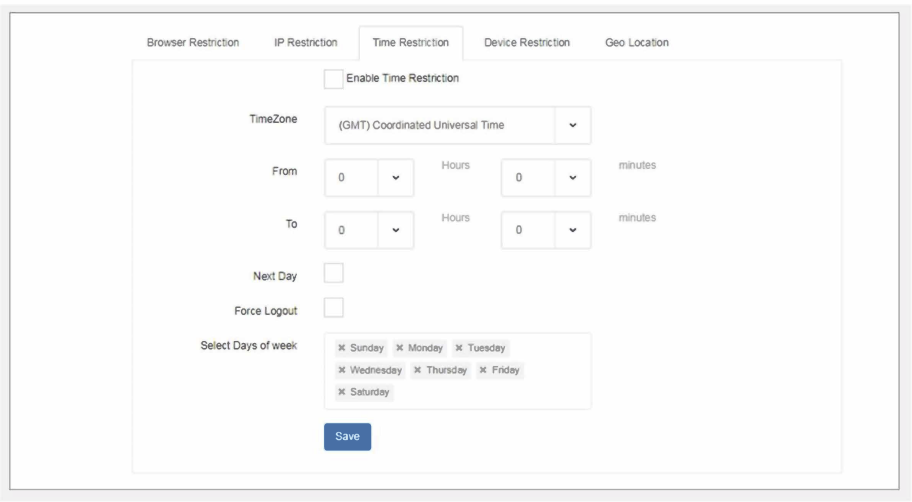
- Check “Enable Time Restriction” policy to users
- Select the Time zone for which you want to apply time restriction policy
- Select From and To hours (if required, admins can also add minutes)
- Select the Force Logout check box if you want to users logged out automatically after the time range
- The policy type should be user based or OU based. If you policy type user based, you will add single user or bulk user (import CSV) in the policy and for OU based you will be able to select your OU in Plurilock AI
Click on SAVE to save the policy created.
Device Restriction:
This feature includes:
- Enables the admin to lock the user to approved laptop/ desktop using MAC-ID-based restriction
- Restrict users to one or more laptop/desktop
- Self Service roll out
Click on ADD POLICY to get started with creation of the new policy and fill in the policy details
- Title: Name your policy to identify it later when you want to make changes quickly.
- Description: Short description of policy (helpful for multiple admins).
- Enabled: If you want the policy to be disabled for some time or to re-enable it, you can check/uncheck “enabled” option as shown above.
- Valid Always: You can decide the validity of the policy with “validity always” button. Toggle if you want a policy for a stipulated time or a policy which is always applied.
- Valid From and Valid To: If “valid always” is off, then you will have to provide the date range the policy. This way the admin won’t need to manually turn off the policy.
Risk: Select risk factor for policies according to the severity: High, Medium, and Low. This data is reflected on the dashboard in the “violation section.”
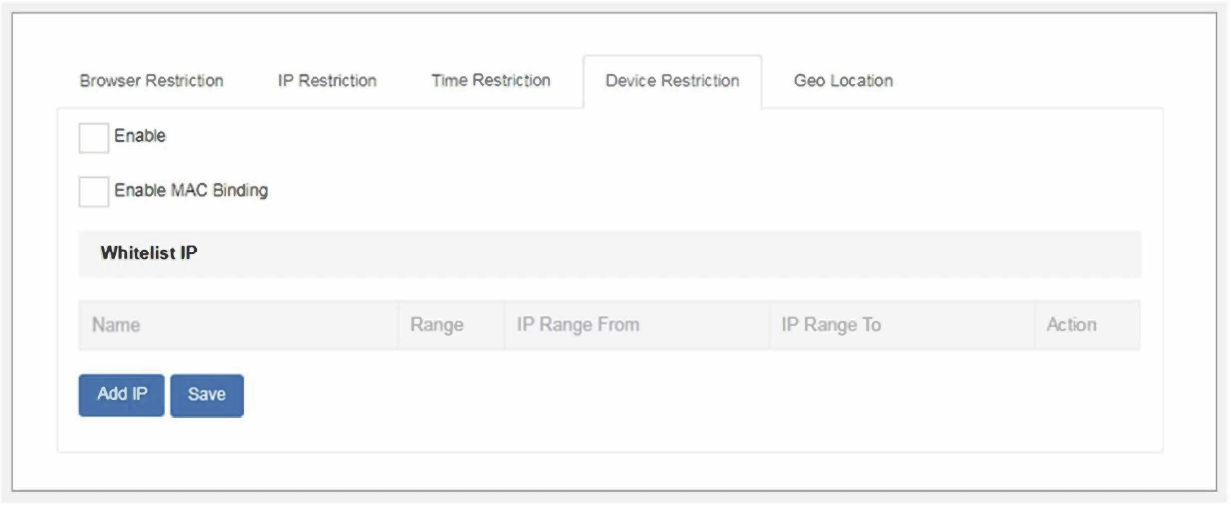
Check the enable checkbox to enable the policy on the user
Check the enable MAC binding is to add the physical Device ID in the policy
Policy type should be users based or OU based. If you policy type user based, you will add single user or bulk user (import CSV) in the policy and for OU based you will be able to select your OU in Plurilock AI apps
Click on SAVE to save the policy created
Geo Restriction:
In this policy features,
- Admins can restrict user geographically
- Geo location can be set country-wise as well as specific location wise
Click on ADD POLICY to get started with creation of the new policy and fill in the policy details
- Title: Name your policy to identify it later when you want to make changes quickly.
- Description: Short description of policy (helpful for multiple admins).
- Enabled: If you want the policy to be disabled for some time or to re-enable it, you can check/uncheck “enabled” option as shown above.
- Valid Always: You can decide the validity of the policy with “validity always” button. Toggle if you want a policy for a stipulated time or a policy which is always applied.
- Valid From and Valid To: If “valid always” is off, then you will have to provide the date range the policy. This way the admin won’t need to manually turn off the policy.
- Risk: Select risk factor for policies according to the severity: High, Medium, and Low. This data is reflected on the dashboard in the “violation section.”
- Enable the policy by checking “enable” checkbox
- Apply the policy country wise by checking radio button and selecting the country
- Admins can also add the geographical location by adding latitude, longitude and radius of particular location
Click “SAVE” to save the policy created.
Was this article helpful?
That’s Great!
Thank you for your feedback
Sorry! We couldn't be helpful
Thank you for your feedback
Feedback sent
We appreciate your effort and will try to fix the article