Password Policy
A password policy is a set of rules designed to enhance cloud security by encouraging users to apply a strong password and use them properly.
The password policy is often part of an organization’s official regulations and is strictly implemented for security reasons.
To apply a Password Policy, Open Plurilock AI console ➔ Go To Identity ➔ Password Policy
Click ➔ Add Policy
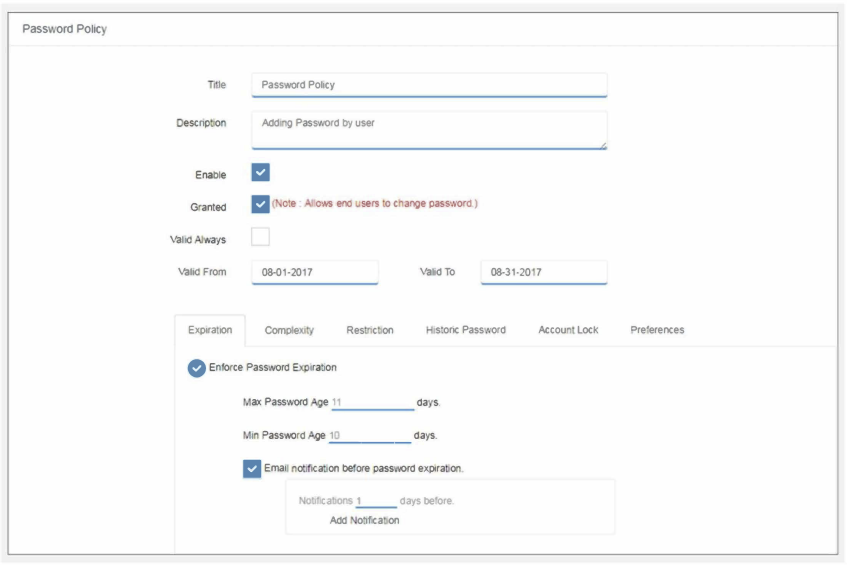
Fill in the policy details.
- Title: Name your policy to identify it later if you want to make changes quickly.
- Description: Short description to describe the policy (helpful for multiple admins)
- Enabled: If you want the policy to be disabled for some time or to re-enable it, you can check/uncheck “enabled” option as shown above.
- Granted: Allows end users to change password. If not checked, then the end user is not able to change their own password
- Valid Always: You can decide the validity of the policy with “validity always” button. Toggle if you want a policy for a stipulated time or a policy which is always applied.
- Valid From and Valid To: If “valid always” is off, then you will have to provide the date range the policy. This way the admin won’t need to manually turn off the policy.
Plurilock AI provides an effective way of addressing security problems through the Advanced Passwords Policy feature.
Plurilock AI’s password policy feature
After login, click ➔ Identity ➔ Password Policy.
To enable rules for password policy, the admin can define the following:
- Complexity of the password
- Set password age (expiration)
- Restrict the user from using the username as their password or certain keywords
- Restrict the user from using last ‘n’ passwords
- Set account lock functionality on certain unsuccessful attempts.
That’s it, the admin doesn’t need to do anything else just make the changes, add the rules, and save.
After this, once users login, they will be forced to change their password as per the policy and in accordance to the new corporate rules.
The administrator has full freedom in framing the password policy for the corporate users and gives full control to the admin to protect the corporate network from unauthorized access.
Now even though users are using Google apps – Plurilock AI, a cloud based solution – allows admins to have better control on your domain.
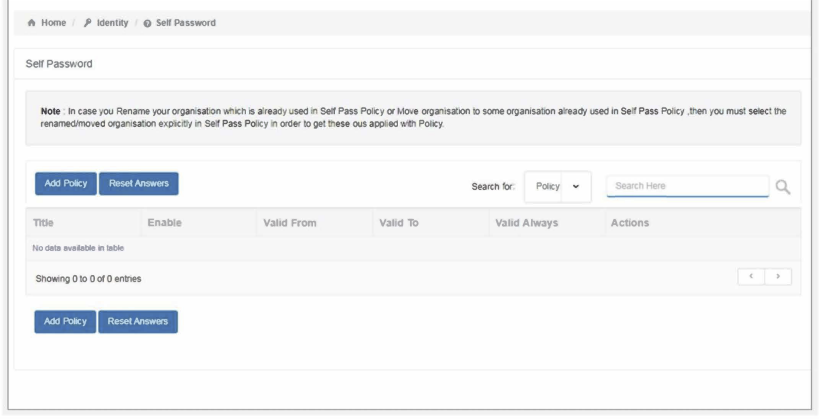
Self Password Policy:
With Plurilock AI, the admin can easily use the self password policy to enable the employees to reset their password by themselves. In case the password is forgotten, there is no need to for administrator help.
On the dashboard, select the “Self Password option” from drop-down of the heading “Identity”
Once you have selected the self password option, there are various settings:
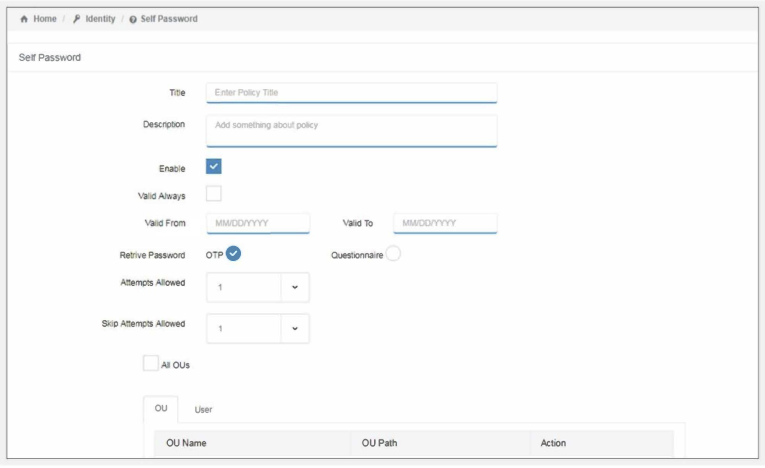
- Title: Name your policy to identify it later when you want to make changes quickly.
- Description: Short description to describe the policy (helpful for multiple admins)
- Enabled: If you want the policy to be disabled for some time or to re-enable it, you can check/uncheck “enabled” option as shown above.
- Valid Always: You can decide the validity of the policy with “validity always” button. Toggle if you want a policy for a stipulated time or a policy which is always applied.
- Valid From and Valid To: If “valid always” is off, then you will have to provide the date range the policy. This way the admin won’t need to manually turn off the policy.
Next, you have to select from the two options to Retrieve Password: OTP or Questionnaire.
OTP
OTP simply uses a registered phone number for resetting.
- From the list box, select the “Number of Attempts Allowed”
- “Skip Attempts”
Questionnaire
The questionnaire method allows the admin has to set various options
- Select number of questions
- Checkbox to “enable random question”
- Choose “number of random question” from the list box
- Specify “number of attempts” allowed
- Specify “skip attempts allowed”
Multi- Factor Authentication:
Plurilock AI supports supports both temporary one-time password (TOTP) multi-factor authentication (MFA) and the use of FIDO2 identifiers for MFA.
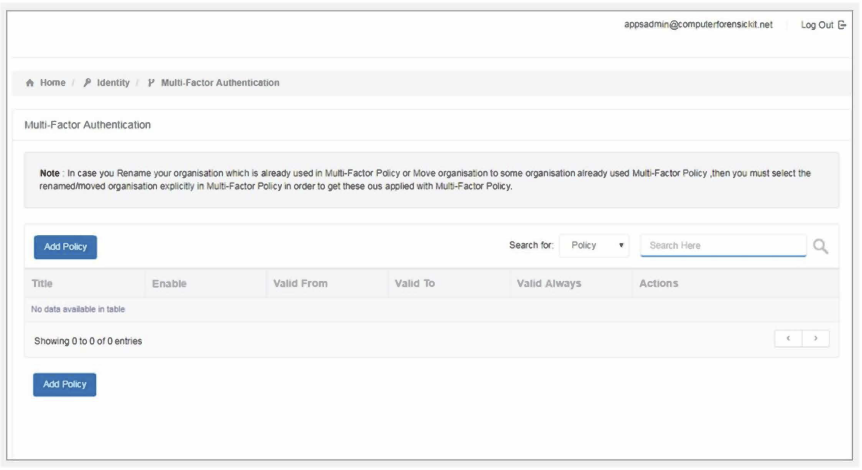
The multi-factor authentication tab appears just below the self password option on the dashboard in identity section. Once selected, a new page appears, with all the authentication settings
- Title Add a unique policy title
- Description Add a description for the policy
- Enable select the “enable” check box to enable the policy.
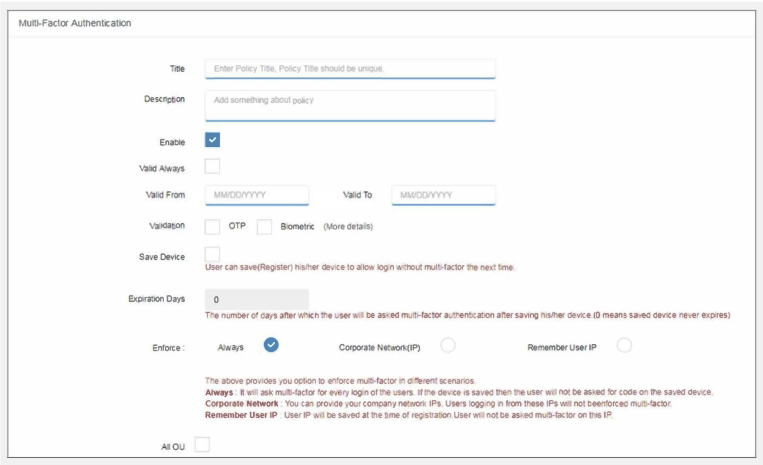
- Title: Name your policy to identify it later when you want to make changes quickly.
- Description: Short description to describe the policy (helpful for multiple admins)
- Enabled: If you want the policy to be disabled for some time or to re-enable it, you can check/uncheck “enabled” option as shown above.
- Valid Always: You can decide the validity of the policy with “validity always” button. Toggle if you want a policy for a stipulated time or a policy which is always applied.
- Valid From and Valid To: If “valid always” is off, then you will have to provide the date range the policy. This way the admin won’t need to manually turn off the policy.
- Validation: The admin must select the validation method. The admin can select both the options simultaneously (OTP and Biometric) or only one at a time (i.e. OTP or Biometric).
- Save Device: If valid always is off, then you will have to provide the date range for which the policy needs to be applied. This way admin doesn’t have to manually turn off the policy
- Expiration Days: The number of days after which the user will be asked multi-factor authentication after saving their device
Now, when admin selects the Biometric Option (only) there are three scenarios to choose from:
Enforce: Enforce Policy includes:
- Always
- Corporate Network
- Remember User IP
Block Access:
- Notify Admin & allow access
- Re-Register IP
On selecting Always, the users will be asked for multi-factor authentication on each login
Alternatively, if admin opts for Corporate Network; all the users logging from the company’s network IPs will not be enforced with multi-factor authentication
In Remember User IP option includes three more options. If users are accessing the account with an unregistered IP address then:
The Block access option will block the login from unregistered IP
- The Notify option will notify the admin when the user logins from unregistered IP through email notification
- The Re-register IP option takes the unregistered IP and registers it and does not prompt multi-factor authentication
Was this article helpful?
That’s Great!
Thank you for your feedback
Sorry! We couldn't be helpful
Thank you for your feedback
Feedback sent
We appreciate your effort and will try to fix the article