Jump to: Checking the System Log | APPENDIX 1: Configuring SMS Notification Service | APPENDIX 2: Configuring Push Notification Service
Checking the System Log
DEFEND maintains an extensive system audit log that tracks administrative actions and system events. Visit System Management → System Log to access this log.
For each logged item, DEFEND records an immutable set of details:
The Date on which the logged event occurred (and the time of day)
The User (administrator) responsible for the action or event
The Type of event in concise terms
Any Details about the event that provide context or related parameters

This log view can be filtered by event type or by date to provide for auditing of DEFEND system configuration changes and administrative actions such as changes in administrator access or accounts.
APPENDIX 1: Configuring SMS Notification Service
To get all necessary information to configure SMS notifications service, first you need to create a new Twilio account at https://twilio.com.
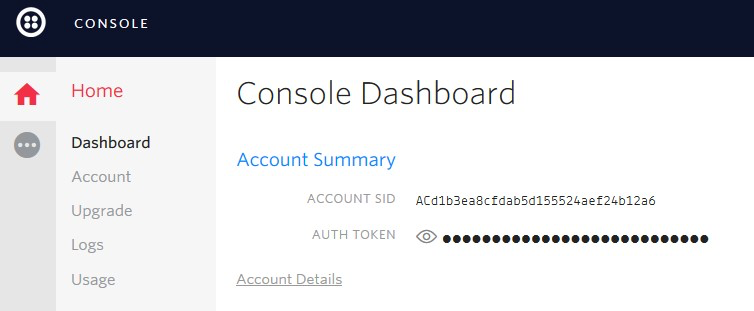
After you log in to your Twilio account, you will see your ACCOUNT SID and AUTH TOKEN on your dashboard. You will need this information to set up the SMS notification service.
NOTE
Twilio uses two types of credentials to determine which account an API request is coming from. The ACCOUNT SID which acts as a username and the AUTH TOKEN which acts as a password.
To learn how to configure a Programmable SMS service, go through the Twilio Programmable SMS documentation available here: https://www.twilio.com/docs/sms/.
After you set up a new Programmable SMS service, go to Programmable SMS → SMS → Messaging Services and select your service. Click on Configure in the navigation menu.
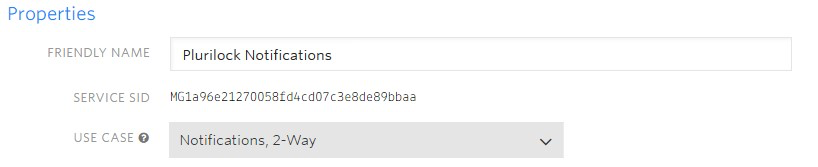
On the Configure page, you will see the name of the service, selected use case, and SERVICE SID. Record it so that you later set up the SMS service.
Now you need to set up the Inbound and Outbound Settings.
NOTE
Remember, you should replace host.domain.com with your server domain
Inbound Select the checkbox ‘Process inbound messages’. In the Request URL Settings input field, provide the inbound request URL in the following format:
https://host.domain.com:9090/webservice/api/twilio/reply
Outbound Settings
In the Status Callback URL input field, provide the outbound URL in the following format: https://host.domain.com:9090/webservice/api/twilio/status
Now you have all the necessary information to configure Plurilock SMS notifications: SERVICE SID, ACCOUNT SID, AUTH TOKEN. Provide this information on the System Configuration → SMS Service page and you will start getting SMS notifications every time a high-risk event is reported.
APPENDIX 2: Configuring Push Notification Service
To get all the necessary information to configure Push notifications service, first you need to create a new Twilio account at https://twilio.com.
To learn how to configure a Push notification service, go through the Authy Two-factor Authentication documentation available here: https://www.twilio.com/docs/authy.
On the settings page, you will see the name of the service and PRODUCTION API KEY. Provide the key on the System Configuration → Authy Configuration page.

Now you need to set up the authentication webhooks for Authy. Click on Push Authentication in the navigation menu.
NOTE
Remember, you should replace host.domain.com with your server domain.
Webhooks In the Endpoint / URL input field, provide the endpoint URL in the following format: https://host.domain.com:9090/webservice/api/authy/reply
To receive Push notifications every time a high-risk event is reported, you need to install the Authy app on your mobile phone. The Authy app is free and available for download from AppStore and Google Play.
Table of Contents
- Front Matter
- Trademarks
- Copyrights
- License Conditions
- Disclaimer
- Contact
- Background
- Plurilock DEFEND Platform
- DEFEND Architecture Details
- First Login to the Admin Console
- Creating a Continuous Authentication Site
- Configuring Services
- Configuring Email Service
- Configuring Out-of-band (OOB) Notifications
- Configuring SMS Notifications
- Configuring Authy (Push Notifications)
- Configuring Health Notifications
- Configuring Identity Providers
- Configuring Webhooks
- Webhook Data Format
- Creating and Managing Administration Console Users
- Creating an Administrator Account
- Editing Your Own Admin Account
- Managing Administrator Roles and Permissions
- Continuous Authentication
- Overview
- Deploying Users
- Managing Continuous Authentication Behavior and Enforcement
- Creating and Configuring Groups
- Group Engine and Policy Settings — Application Rules
- Group Engine and Policy Settings — Biometrics
- Group Engine and Policy Settings — Enforcement
- Group Engine and Policy Settings — Data Deletion
- Moving Users Between Groups
- Managing User Biometric Profiles
- Monitoring Alerts
- Using Continuous Authentication Logs
- Understanding Risk Levels and Log Outcomes
- Automated Engine Training
- System Dashboard
- System Audit Logging and Appendices
- Checking the System Log
- APPENDIX 1: Configuring SMS Notification Service
- APPENDIX 2: Configuring Push Notification Service
Was this article helpful?
That’s Great!
Thank you for your feedback
Sorry! We couldn't be helpful
Thank you for your feedback
Feedback sent
We appreciate your effort and will try to fix the article