Jump to: Creating an Administrator Account | Editing Your Own Admin Account | Managing Administrator Roles and Permissions |
Creating an Administrator Account
By clicking on the System Management → Manage Admin Accounts, the list of created Administrator accounts will be displayed. Using this menu, you can create, delete, and edit Administrator accounts.
NOTE
To fully manage administrator accounts, an administrator must be assigned an administrative role that has Admin Account access, manage, and delete permissions. Permissions for each role can be managed in System Management → Roles and Permissions.

To create a new Administrator account, сlick on the Create Admin account button. Fill in the registration form and press Register. An email will be sent to the user with a link to activate the account.
To edit an Administrator account, click on the Edit button for the account you want to edit. Make changes and click the Update button.
To disable an Administrator account, click the Disable button for the account you want to disable.
To delete an Administrator account, click the Delete button for the account you want to delete.
The far-right column in the table of administrator accounts shows the current MFA status for each administrative user.
QR Ready is shown when an administrator has not yet completed enrolling a device (e.g. mobile phone and authenticator app) for their account. Their next login attempt will require them to enroll a device before they can log in.
Reset is shown when an administrator has successfully enrolled a device (e.g. mobile phone and authenticator app) for their account. They are required to provide a valid authenticator app code in order to log in.
If an administrator loses or is forced to replace their mobile device, another administrator with admin account management permission can click Reset to reset their device enrollment. Once Reset is clicked, their status will change to QR Ready and they will be required to enroll a new device at next login.
Editing Your Own Admin Account
You can edit your own administrator account, even if you do not have general admin account management permissions, by clicking on your user name in the top right corner of the screen.
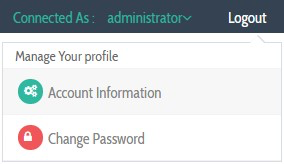
Select Account Information to change your first name, last name, email address, and preferred language.
Select Change Password to change the password that you use to access the DEFEND Admin Console. To change the password, you are first required to provide your username and current password.
Managing Administrator Roles and Permissions
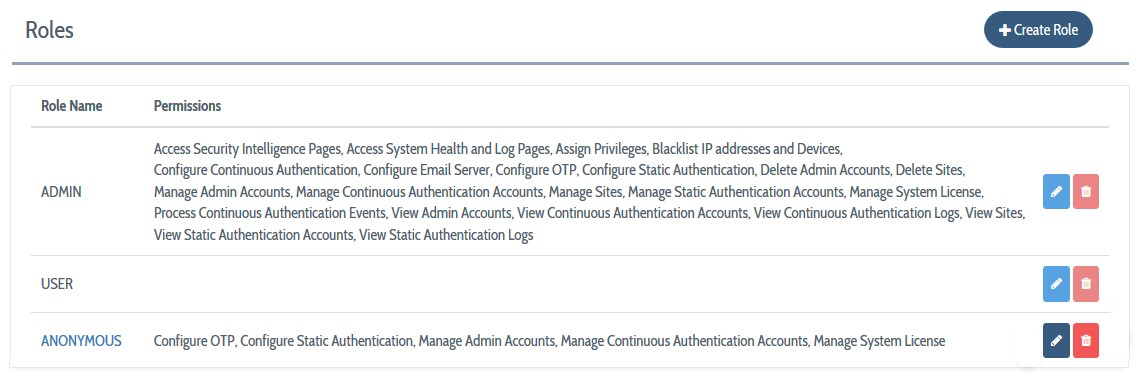
To manage roles and permissions for administrator accounts, visit System Management → Roles and Permissions. This view enables you to create, delete, and edit the administrative roles associated with your DEFEND console, and the permissions that attach to each of them.
To create a new role, click on the + Create Role button. Provide the name of the role, and select the permissions associated with the role. Click on the Save button to create a new role.
To delete a role, click on the Delete button in front of the role you want to delete. In a new confirmation window, click on the Delete button again.
To edit role information or modify the list of permissions granted for a role, click on the Edit button in front of the role you want to edit.
NOTE
The Admin users assigned to a deleted role are not able to exercise the same privileges as before. Ensure that you update administrative accounts to attach to a new role before deleting an existing role. The ADMIN role is a special, "super administrator" role, and can not be changed.It is strongly recommended that only a single administrator in your organization be granted the ADMIN role, with all other administrators being assigned to custom roles with carefully curated permissions.
Table of Contents
- Front Matter
- Trademarks
- Copyrights
- License Conditions
- Disclaimer
- Contact
- Background
- Plurilock DEFEND Platform
- DEFEND Architecture Details
- First Login to the Admin Console
- Creating a Continuous Authentication Site
- Configuring Services
- Configuring Email Service
- Configuring Out-of-band (OOB) Notifications
- Configuring SMS Notifications
- Configuring Authy (Push Notifications)
- Configuring Health Notifications
- Configuring Identity Providers
- Configuring Webhooks
- Webhook Data Format
- Creating and Managing Administration Console Users
- Creating an Administrator Account
- Editing Your Own Admin Account
- Managing Administrator Roles and Permissions
- Continuous Authentication
- Overview
- Deploying Users
- Managing Continuous Authentication Behavior and Enforcement
- Creating and Configuring Groups
- Group Engine and Policy Settings — Application Rules
- Group Engine and Policy Settings — Biometrics
- Group Engine and Policy Settings — Enforcement
- Group Engine and Policy Settings — Data Deletion
- Moving Users Between Groups
- Managing User Biometric Profiles
- Monitoring Alerts
- Using Continuous Authentication Logs
- Understanding Risk Levels and Log Outcomes
- Automated Engine Training
- System Dashboard
- System Audit Logging and Appendices
- Checking the System Log
- APPENDIX 1: Configuring SMS Notification Service
- APPENDIX 2: Configuring Push Notification Service
Was this article helpful?
That’s Great!
Thank you for your feedback
Sorry! We couldn't be helpful
Thank you for your feedback
Feedback sent
We appreciate your effort and will try to fix the article