Jump to: Overview | Overview | Deploying Users | Managing Behavior and Enforcement | Creating and Configuring Groups | Group Policy — Application Rules | Group Policy — Biometrics | Group Policy — Enforcement | Group Policy - Data Deletion | Moving Users Between Groups | Managing User Biometric Profiles | Monitoring Alerts | Using Continuous Authentication Logs | Risk Levels and Log Outcomes | Automated Engine Training | Pausing Continuous Authentication | Creating Reports
Overview
When the DEFEND agent is installed on a user's computer or workstation and they begin to work, the DEFEND service automatically does the following:
Create a user record for the user based on the username of their computing session
Learn about their typical biometric keyboard and/or mouse movement patterns, a process that usually completes in hours to several days of work time
Once an initial period of learning is complete is complete, pivot to continuous authentication mode for the user
In continuous authentication mode, the biometric signature that DEFEND has already learned for the user is compared every few seconds to the biometric signature of their real-time keyboard and/or mouse input, and a match/no match decision and related timestamp is generated and stored.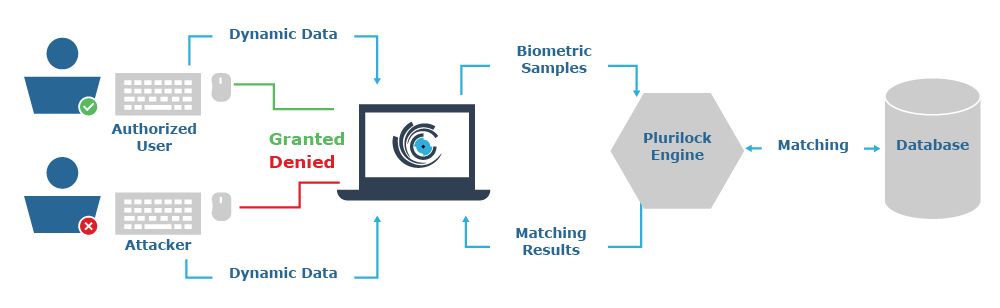
Everything else that DEFEND does results from this basic, ongoing process of continuous identity checking based on current user input, following initial learning for each user. Identity checks typically occur regularly every 3-5 seconds whenever the user is providing input, with the result of each check and its timestamp being stored in the DEFEND authentication log database.
Deploying Users
The DEFEND service, in cooperation with the DEFEND agent, agent automatically:
Gathers the identity of the user from the local session
Creates a user account for them
Learns (generates a profile) of their keyboard and/or mouse movement behavior
Associates this enrolled profile, and all future authentication events, with their user account
For this reason, deploying DEFEND users for continuous authentication requires only that the DEFEND endpoint agent be installed the workstation(s) or computer(s) where your organization's work takes place.
To install the DEFEND agent on a workstation or computer, either:
Download the most recent version of the DEFEND agent installer for either Windows or Mac OS and install it on the workstation(s) or computer(s) in question, or
Used centralized administration tools to deploy the DEFEND agent .msi (or using Jamf on Mac OS) to targeted workstations where work takes place
Once the agent has been deployed to a workstation or computer, any user that logs into it will be enrolled (learned about) and then continuously authenticated in real time going forward once enrollment is complete.
Managing Continuous Authentication Behavior and Enforcement
Administrators typically have several goals for the use of DEFEND in their enviroment:
Monitoring current identity risk levels across the workforce (e.g. "Which accounts are currently behaving strangely, and may represent unauthorized use situations?")
Generating proactive alerts for instances of elevated risk (e.g. "Let me know when certain accounts are behaving strangely enough that I care.")
Taking automated action against some accounts if anomalous behavior is seen (e.g. "When these accounts may be experiencing unauthorized use, prevent continued use.")
Making decisions about access based on currently observed DEFEND identity decisions (e.g. "When DEFEND says this user is good, let them in to a particular service; when DEFEND says this user may be an imposter, do not let them in.")
In most organizations, these use cases involve:
Segmenting users into cohorts (groups) according to desired DEFEND behavior and risk tolerance levels for each user
Configuring the behavior of DEFEND for each of these groups to enable the desired outcome
As users are deployed to DEFEND via the installation of the DEFEND agent on workstation(s) and computer(s), administrators likely therefore need to manage user groups (which risk cohorts exist in the organization, and which users belong to each of them) and the DEFEND engine behavior and policies associated with each group (how DEFEND should behave, or what DEFEND should do, as it continues to make and store real-time identity checks for members of this group).
Creating and Configuring Groups
DEFEND uses the concept of groups to manage the policies and behavior associated with each DEFEND user. Each DEFEND group:
"Contains" a number of DEFEND users
Is associated with a group policy that dictates how DEFEND behaves as it performs learning and continuous authentication tasks, what constitutes an alert-worthy risk level, and what to do when such a risk level is detected
The group named "Default" is present in every DEFEND instance and is the group to which newly created DEFEND users are first assigned when the log in and begin to work. Administrators with sufficient group management permissions can:
Create new DEFEND user groups
Move DEFEND users group one group to another group
Configure the DEFEND behavior that will apply to each group
To manage your DEFEND groups, visit Continuous Authentication → Group Management. There, you will see a list of the groups that currently exist in your DEFEND instance, and the DEFEND behavior and enforcement policies that apply to members of each group.
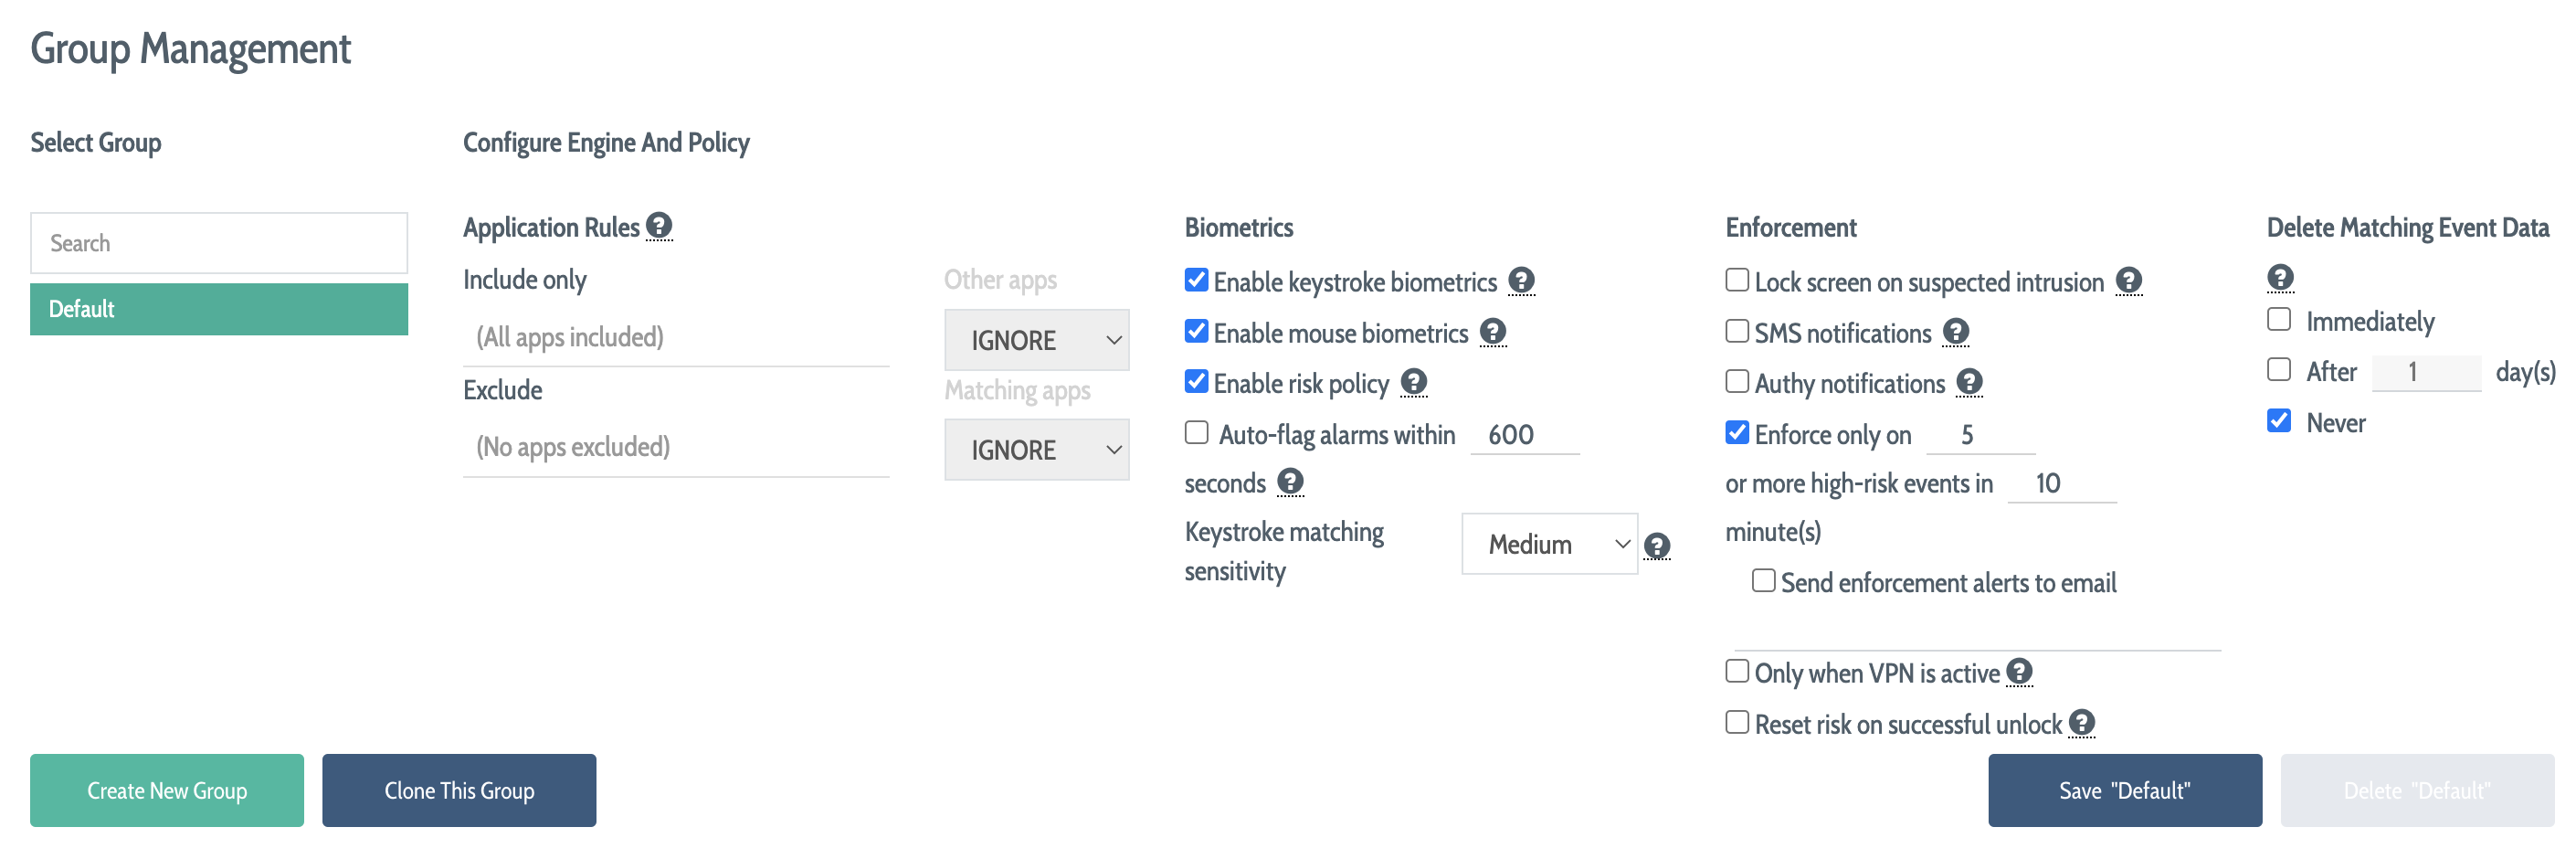
On the left side of this view, DEFEND shows a list of the groups that currently exist. On the right side of this view, DEFEND shows policy configuration options that will apply to the currently selected group. In the bottom half of the view (not shown above), DEFEND shows a paginated list of the users that currently belong to the selected group.
To create a new group, click Create New Group and provide a name for the new group
To configure or change the behavior or policies that will apply to members of a group, edit the settings shown on the right side of the view and then save your changes
To delete an existing group, select the group in the column on the left, then click Delete to delete the group; note that all users currently belonging to the deleted group will be moved back to the "Default" group when this occurs
To move users into or out of a group, use the Continuous Authentication → User/Agent Explorer tool discussed in its own section of this guide
The following sections of this guide detail the behavior and policy configuration options that can be applied to each group.
Group Engine and Policy Settings — Application Rules
The Application Rules options provide for whitelisting and blacklisting of particular applications as a user performs work on a DEFEND-enabled workstation or computer.
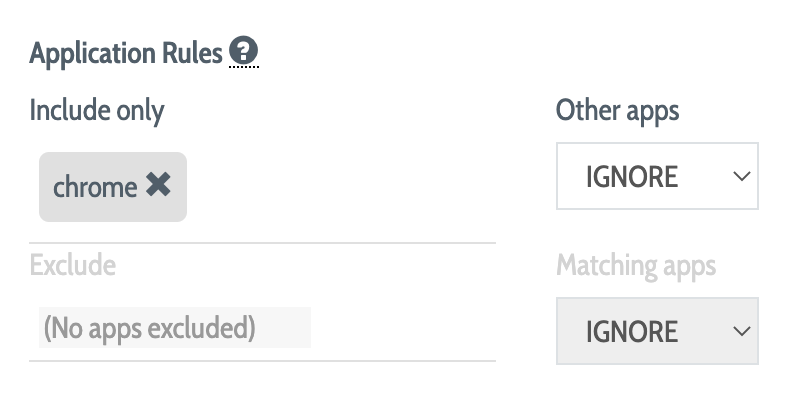
The Include Only option behaves as a whitelist, causing DEFEND to be active only when the user is using a particular list of applications.
The Exclude option behaves as a blacklist, causing DEFEND to ignore a particular list of applications.
These options are mutually exclusive; configure Include Only or Exclude but do not configure both. To enter and curate a list of applications:
Click on the entry field for Include Only or on the entry field for Exclude, after which you'll see a blinking cursor.
Type names of an application to include (or exclude) one at a time, pressing Enter after each application name.
Each time you press Enter, the application name will turn into a removable tile.
Click "X" next to an existing tile to remove the application from the list.
Once you have entered a list of applications to include (or exclude), select how these inclusions (or exclusions) should be treated using the drop-down list on the right.
Select Ignore if DEFEND should ignore included (or not excluded) applications entirely, e.g. make and store store no decisions about risk while they are active.
Select Monitor if DEFEND should still evaluate and store risk evaluations while these applications are in use, but should take no other actions.
NOTE
Application names are delivered by the workstation or computer's host operating system and may vary from implicit expectations. The best way to build a list of applications for the Application Rules tool is generally to observe ongoing authentication logging and use the application names provided in these logs to build the list entered in this tool.
Group Engine and Policy Settings — Biometrics
The Biometrics options control the ways in which the DEFEND engine evaluates users' biometric signatures, and the ways in which these evaluations are related to risk.
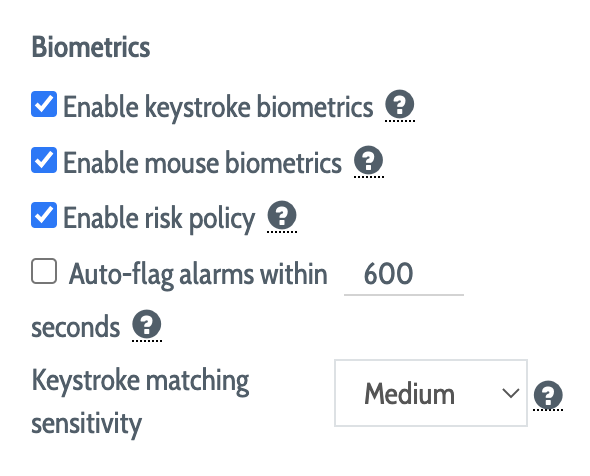
Normally, both keystroke and mouse biometric evaluation is enabled, but if a particular group should be evaluated only on keyboard movement patterns or only on mouse movement patterns, uncheck the keyboard or mouse biometric options for the group.
The Enable risk policy option, which is enabled by default, causes DEFEND to apply additional heuristics to risk analysis, rather than to treat each authentication event absolutely and in isolation; in general, if this option is disabled, DEFEND's identity checks will be more stringent, but may generate a larger number of false positives.
The Auto-flag alarms option causes DEFEND to automatically "learn" that anomalous behavior is valid if the user has completed step-up authentication via SMS or Authy in the specified time frame; otherwise, DEFEND will treat anomalous behavior as risky (and not automatically learn from it) regardless of how recently the user has completed a step-up authentication.
The Keystroke matching sensitivity level controls how stringent DEFEND is in its analysis of particular sequences of keystrokes; for most organizations, the "Medium" setting represents a good balance between security and usability
The default DEFEND biometrics configuration for the "Default" group is generally considered to be an ideal baseline for most organizations based on Plurilock's field experience. In general, it is a best practice to begin a new DEFEND deployment using these defaults and then to gradually tweak them for newly created groups in order to "tune" DEFEND's behavior for purpose.
Group Engine and Policy Settings — Enforcement
The Enforcement options configure how DEFEND will behave for a particular group in relation to the risk evaluations that it makes.
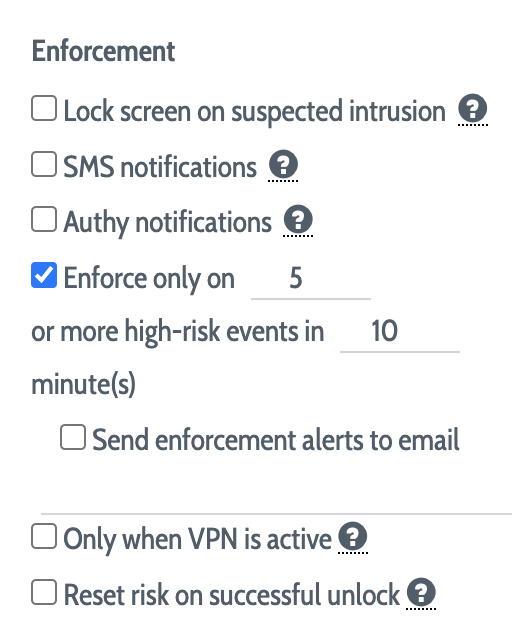
If Lock screen on suspected intrusion is enabled, the user will experience a screen lock when DEFEND reaches an alert state for the user, and the user will be required to complete a Windows Hello or Mac OS screen log authentication in order to continue computing.
If SMS notifications is enabled and SMS notification support has been configured for your DEFEND instance, the user will receive a notification via SMS containing a one-time code when DEFEND reaches an alert state for them. If the one-time code is not provided, their screen will be locked.
If Authy notifications is enabled and Authy support has been configured for your DEFEND instance, the user will receive an Authy push notification when DEFEND reaches an alert state for them. If the push notification is not approved, their screen will be locked.
The Enforce only on options instruct DEFEND to determine that an alert state has been reached only if a particular number of match failures occurs over a particular time period. Because DEFEND is highly sensitive to anomalous behavior (which can be caused by simple gestures like answering a phone or scratching an itch while typing), groups should generally be configured to enforce only if multiple elevated risk checks occur over several minutes. An email address can be provided for security operations center notifications whenever this alert state is reached for a group.
If Only when VPN is active is enabled, DEFEND will perform evaluate and act on risk only when the user's computer is connected to a VPN. This option is generally most useful for remote work environments.
If Reset risk on successful unlock is enabled, DEFEND will "reset" its risk evaluations whenever the user successfully unlocks their screen following an enforcement event. This prevents "already acted on" checks from being included in the risk evaluations that immediately follow a successful unlock.
NOTE
If enabled, users' responses to the SMS or Authy notifications are also used to tell DEFEND whether to treat the suspicious activity as new legitimate activity (and learn from it) or to continue to treat the activity as suspicious and lock the user out if an incorrect response (or no response) is received to the notification.
Group Engine and Policy Settings — Data Deletion
The Delete Matching Event Data options control how the storage of matching data (input monitoring data determined by DEFEND to not be risky, e.g. to be the result of authorized user activity) is handled.
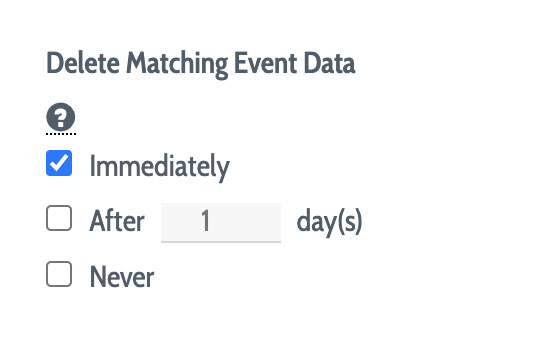
By default, DEFEND groups are configured to discard matching data immediately following evaluation of risk level.
Unless instructed to change this setting by a Plurilock representative over the course of a support interaction, organizations are encouraged not to change this setting, as the retention of matching data does not currently provide any additional DEFEND functionality, and is primarily useful for performance profiling and diagnostic purposes.
Moving Users Between Groups
Once you have created custom groups and configured policies for them, visit Continuous Authentication → User/Agent Explorer to move users from the "Default" group where they are initially created into the group to which they should belong.
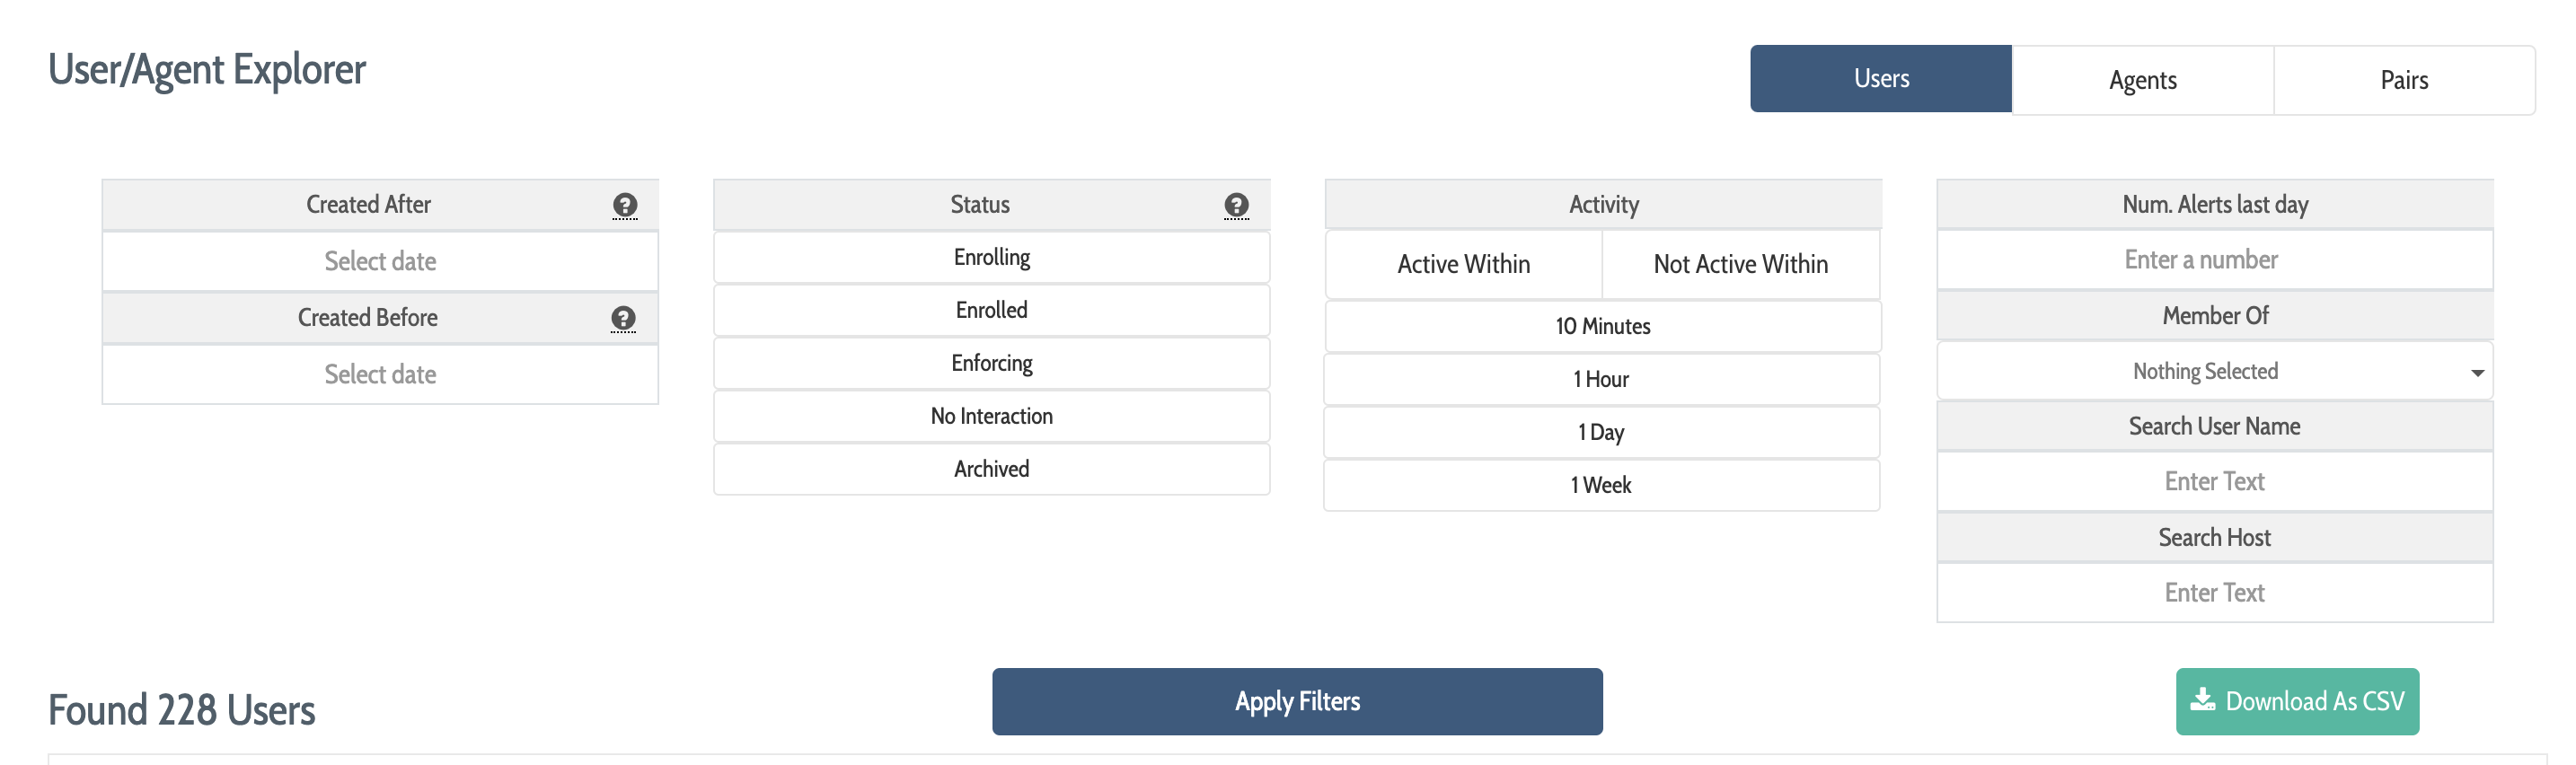
In the User/Agent Explorer use the filtering tools on the top half of the tool to filter the list of users displayed in the bottom half of the tool.
Use Created After to find users whose DEFEND deployment dates fall after a certain date
Use Created Before to find users whose DEFEND deployment dates fall before a certain date
Use Status to filter by the user's biometric data and enforcement status: Enrolling for users about whom DEFEND is still learning; Enrolled for users that DEFEND has learned about; Enforcing for users that are currently in a group whose lockout policy is enabled; No Interaction for accounts that have been identified by DEFEND via the DEFEND agent, but that have never engaged in interactive keyboard or mouse activity
Use Last Active Within to filter by how recently DEFEND has seen the user engaged in interactive keyboard and/or mouse activity
Use Member of to filter users by their current group membership
Enter a text string into Search to search by username or host
Filters can be combined to narrow the list of users to display. Once all filters have been set according to your needs, click Apply Filters to display the filtered list of matching users in the lower half of the page.
To move users to a new group:
Select the users to be moved using the check box in the far left column
Select the destination group for the selected users from the drop-down list
Click Move/Add to complete the move operation
Alternatively, to move all of the users returned by a filtering operation to a new group, click the All button to the left of the group drop-down list and then perform steps #2 and #3 above.

Note that once a user has been moved to a new group, the policies for the group to which they now belong take effect immediately, and the user's DEFEND experience is controlled by the policies of that group from that point forward.
Managing User Biometric Profiles
DEFEND works by building biometric profiles of a user's keyboard and mouse activity. Because movement patterns can vary depending on the keyboard or mouse hardware in use, DEFEND maintains more than one profile for each user:
One keyboard master profile containing the most general understanding of a user's keyboard movement habits
One mouse master profile containing the most general definition of a user's mouse movement habits
Individual device profiles, one for each individual keyboard and mouse device, that contain a more specific understanding of the user's behavior when using each particular piece of hardware
In most cases, DEFEND manages profile creation and maintenance well on an automatic basis. However, there may be cases in which it is necessary to reset a profile (e.g. what DEFEND has already learned about a user or device) because it is clear that a profile may no longer be accurate. For example, this may occur when:
A user injures their hand(s) and so their movement style changes quickly and drastically
A new keyboard protector or mouse pad is added that may change how the user interacts with an already known, already profiled device
It is discovered that two distinct users were sharing the same account during enrollment, leading DEFEND to learn about both users' movements as though they were a single user
In the User/Agent Explorer tool (see above), click on any username to access that user's individual account page, where a list of the user's profiles and their statuses is also displayed.
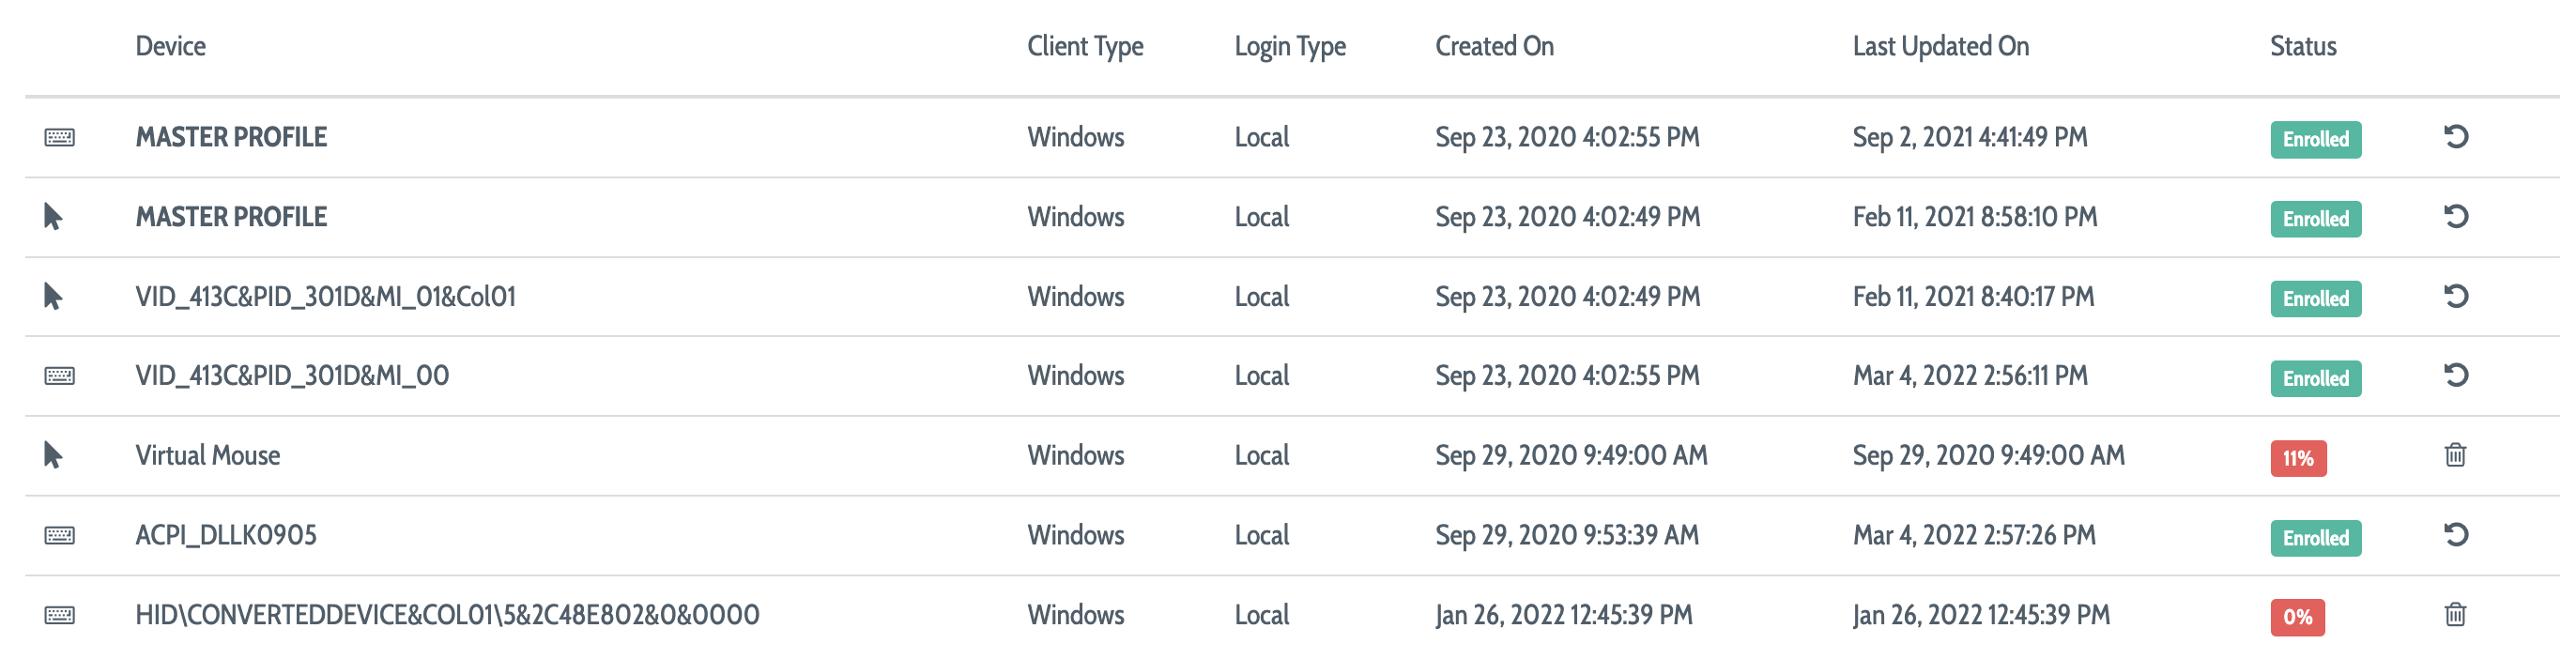
For each profile, among other things you will see:
The device ID from the user's local host operating system
The operating system (Windows or Mac) of that machine
A status for the profile in question: green for enrolled and various other statuses for various states of enrollment
To reset a keyboard or mouse profile, click the circular arrow icon next to the profile in question. DEFEND will return that profile to enrollment and begin to create the profile again from scratch automatically.
Profiles that are not complete—that are still enrolling—cannot be reset, but can be deleted for decluttering purposes. If a partially enrolled profile is deleted but the device is still in use, DEFEND will create a new profile for the device immediately and begin to enroll it.
Monitoring Alerts
DEFEND will generate an alert condition, and may generate related enforcement actions, when:
- An authentication failure is detected for a fully enrolled user, e.g. the behavior in one of DEFEND's ongoing every 3-5 seconds checks does not match the expected movement behavior for that user, and
- The user in question belongs to a group for which an alerts policy has been configured (e.g. Enforce on X events in Y minutes or similar)
When this occurs, DEFEND will log an alert condition for that user. Alerts generated by DEFEND users can be monitored by visiting Continuous Authentication → Alerts.
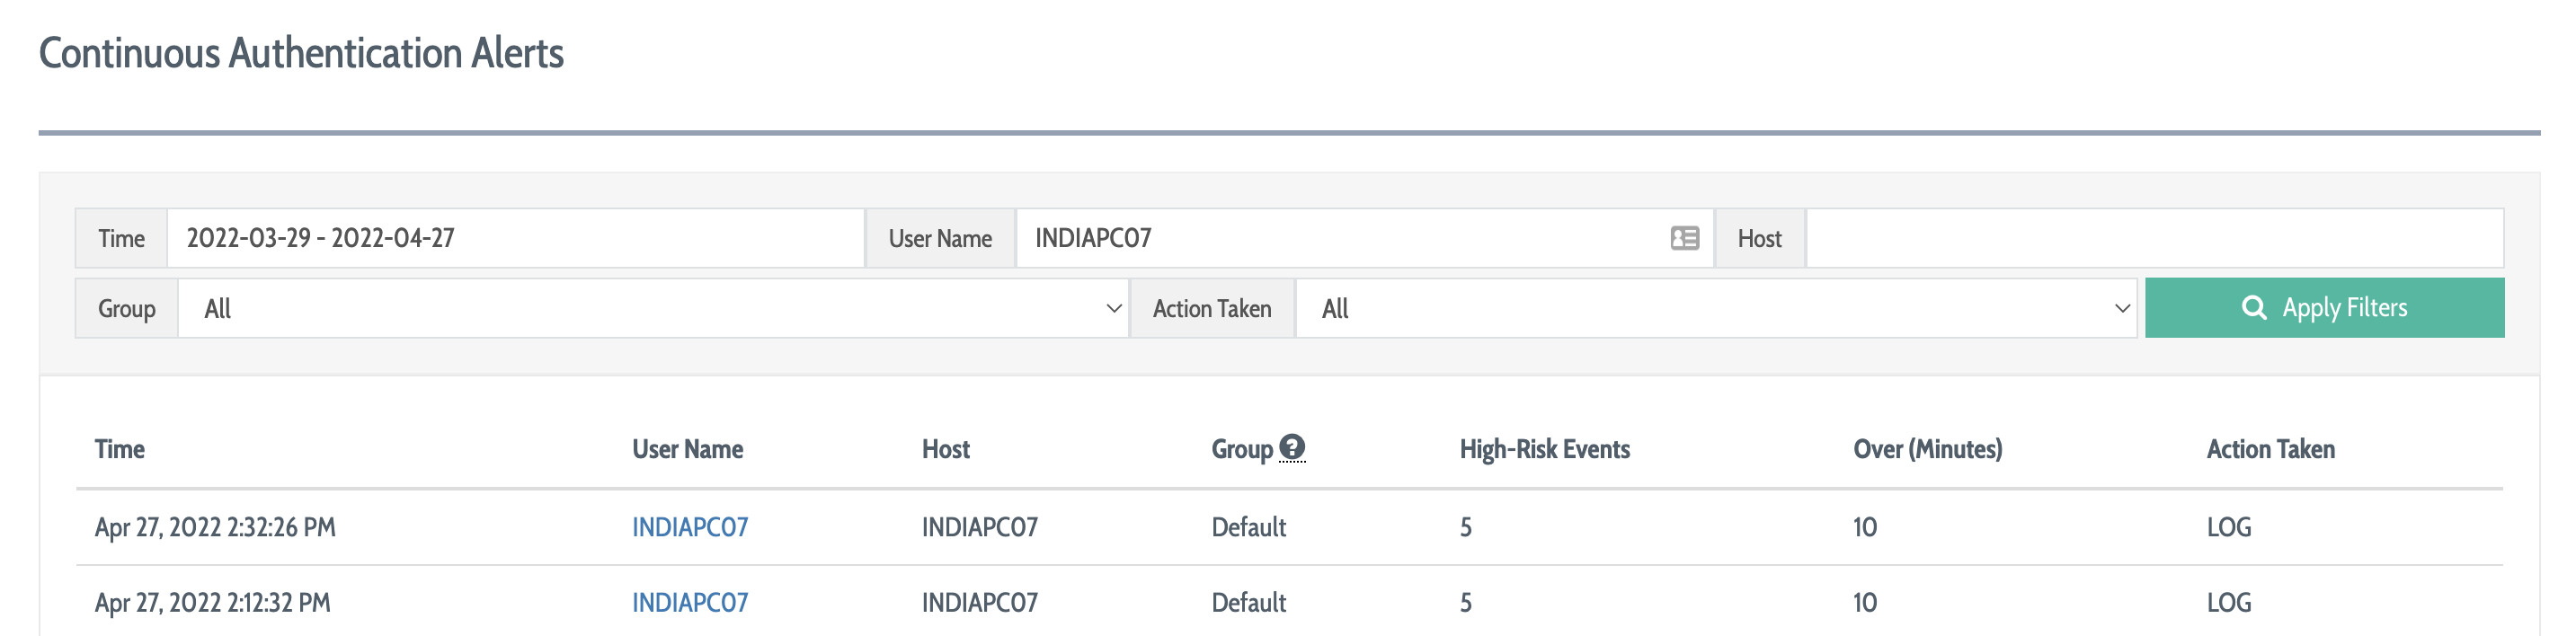
This tool provides a filtered view of all of the alert conditions that DEFEND has logged. Leave filters blank to view the most recent alerts, or use the filters at the top of the tool to narrow by time range, username, host, group, or action taken.
Each row in the list of alerts represents a single alert condition and shows:
The Time at which the alert condition was generated
The User that generated the alert condition
The Host that the user was using at the time
The Group to which the user in question currently belongs, even if this has changed since the alert was generated
The number of risk events over a particular time frame that led to the alert condition
The Action Taken as a result of this alert, either LOG if the alert was simply logged to this tool or LOCK if the user experienced an automatic screen lock as a result of the alert and the policy configuration of the group to which they belonged at the time
The data in the alerts view can also be consumed via the DEFEND enforcementAlerts API endpoint, which is documented in the Plurilock DEFEND API guide.
NOTE
The Alerts tool and enforcementAlerts API endpoint are the preferred way to consume DEFEND risk information and decisions, as they are both easy to use and load-friendly.For this reason, Plurilock strongly encourages administrators to create an enforcement alerts policy of X events in Y minutes for every group that sees active users, as only groups with such a policy configured will generate alerts.
Using Continuous Authentication Logs
In some cases, the data captured in the Alerts tool may be insufficiently granular or specific for particular forensic or investigations tasks. Visit Continuous Authentication → Logs to view the "raw" moment-by-moment logs of DEFEND's match/no match decisions for fully enrolled users.
NOTE
This is a noisy tool with a high data flow rate, and is often difficult to interpret. It is strongly recommended that organizations rely on DEFEND's alerts capability and tool rather than logs whenever possible.
Each row in the Logs tool represents a DEFEND decision about a single user's identity—either confirmed or not confirmed. Administrators should keep in mind as they use this view that new data is generated every 3-5 seconds for every active user, so it is difficult both to monitor and to filter this view, as its underlying data is rapidly changing.

There are several controls available to you in the tool:
- Use the filtering options at the top to filter the list of results according to your needs
- Use the Static/Real Time selector to switch between static (does not automatically refresh) and real-time (automatically refreshes every few seconds with the latest data) views
For each row, the following information is displayed:
The numeric ID of the authentication event for reference purposes
The Site to which the DEFEND agent in question belongs
The Host from on which authentication event was carried out
The User that generated the authentication result
The Client Type of the agent in question, either Windows or Mac
The Device that was being used when the authentication event was generated
The Date and time of the authentication event
The Process that was in use when the authentication event was generated
The Risk Level that DEFEND associates with this particular authentication event
Any Action taken as a result of this individual event
Any Notes about the authentication event, notably including whether it is covered by a monitor-only condition using the App Control (blacklist/whitelist) policy for the user's group, and whether this specific decision has been marked as a false alarm via SMS, Authy, or administrative action, and thus returned to the DEFEND engine for further learning about the user
Click on the downward-facing carat at the far right of any log entry to get additional detailed information about the profiles, analysis, and biometric scores that were included in the calculation (which range from 0-1 for keyboard and are either -1 or 1 for mouse) for the decision in question.
Understanding Risk Levels and Log Outcomes
When analyzing individual log entries, you may discover that individual decisions can at times result from multiple biometric checks, each representing a period of several seconds. In such cases, DEFEND has used a "majority voting" strategy to determine whether or not the user has passed or failed a check.
When a biometric "no match" condition is encountered for a few seconds of user activity, DEFEND waits for a few moments to gathers additional input data from the user
If two out of three sequential biometric scores result in a clear "no match" condition, the user fails that biometric check
If several biometric checks are failed in sequence and Enable risk policy is on for the user's group, the risk level for that user is elevated, first to L (elevated risk, low level), then M (elevated risk, medium level), and finally H (high risk)
If the user's group does not have Enable risk policy on, then the risk level for the user is immediately elevated to high risk
If the user in question belongs to a group with an active alerts policy, sequential high risk decisions are gathered until the user crosses the threshold into alert status; an alert is then generated
If the user in question belongs to a group without an active alerts policy, any actions configured for the group (screen lock, SMS step-up, Authy step-up) occur immediately as soon as a single high risk decision is rendered
Note that authentication decisions for keyboard and mouse are made separately at the individual log event level; each row in the log represents either a keyboard decision or a mouse decision for a given user.
Automated Engine Training
DEFEND's initial enrollment for a user or device marks a baseline level of learning that is required in order to make decisions about a user's identity.
However, further learning can often optimize user profiles and result in a reduced false rejection rate when groups are not configured to enable users to train DEFEND on-the-fly using SMS or Authy step-ups.
To train DEFEND using already generated rejection data, visit Continuous Authentication → False Alarm Marking.
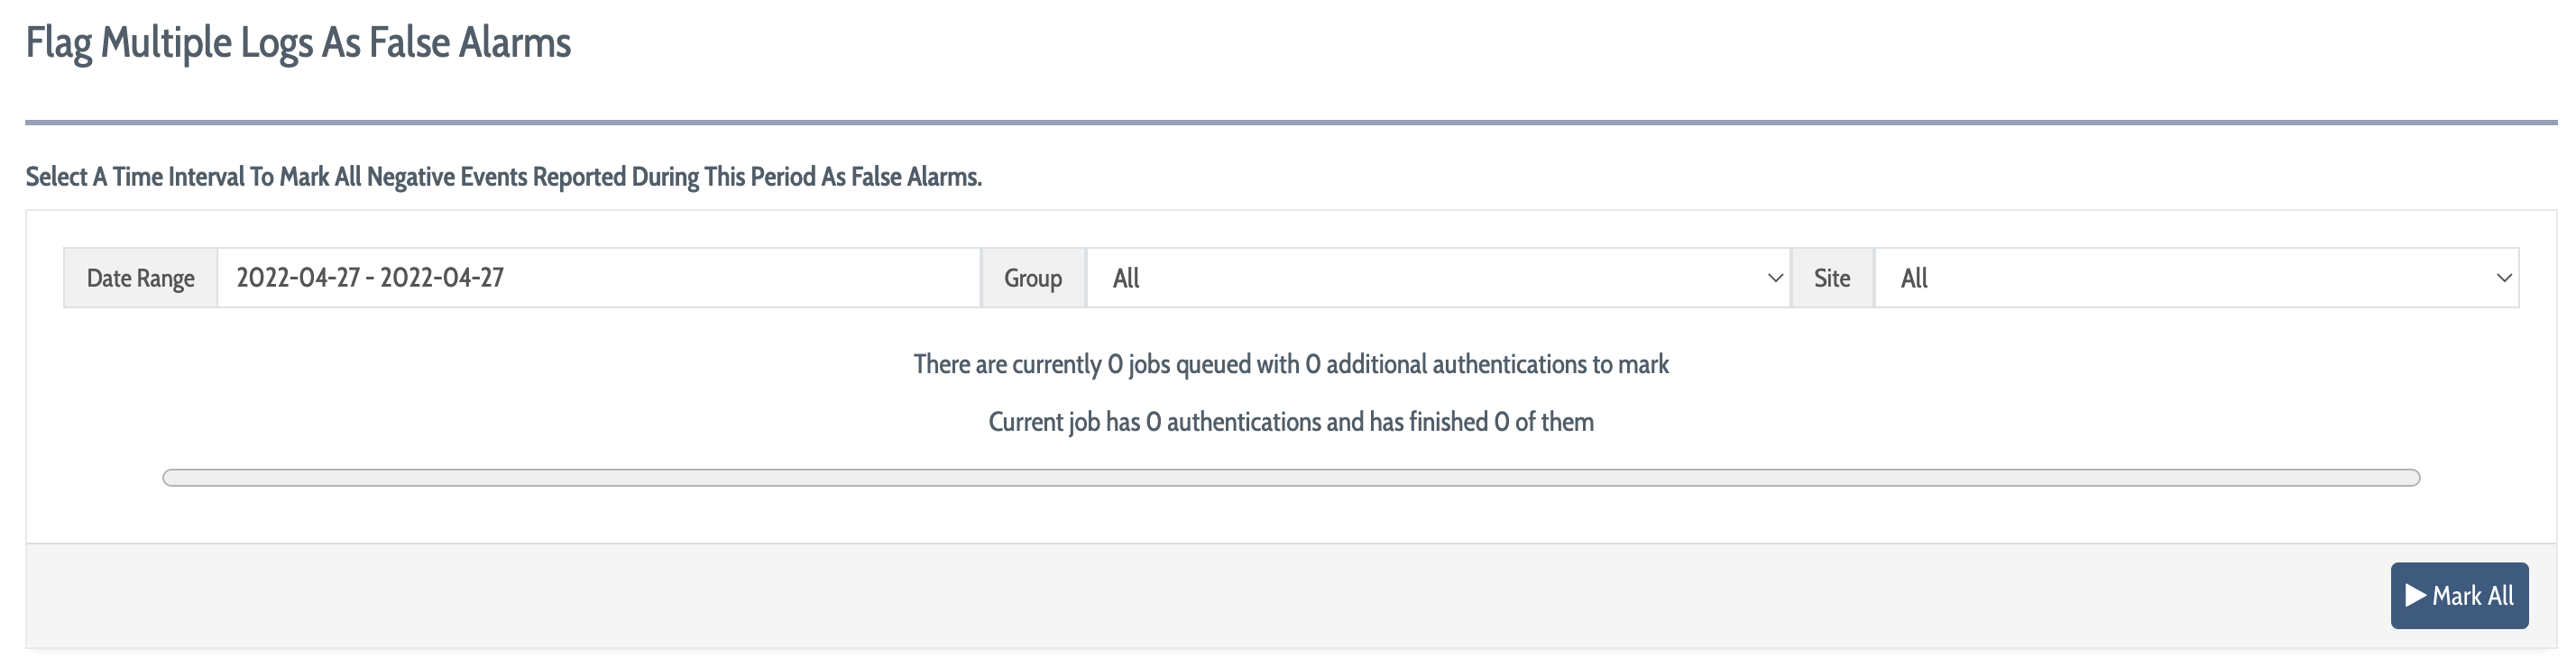
In the tool, perform the following steps:
Select a date range for log events to use for further training
Select the group of users to be trained
Select the site for the agents that generated the data
Click Mark All to begin the training process on the body of data
Depending on the number of log entries and amount of data to be analyzed, bulk analysis and training may take some time to complete; the progress indicator will show progress toward completion as training is carried out.
NOTE
Only administrators with Process Events permission have access to this tool. See Assigning Administrator Permission to learn how to assign permissions to a role.
Pausing Continuous Authentication
From time to time it may be useful to pause DEFEND's evaluation of a user's identity—for example, when the user will be coordinating with IT support on a screen share, and as a result DEFEND may detect activity from another user on their machine.
To temporarily pause authentication for DEFEND user(s), follow these steps:
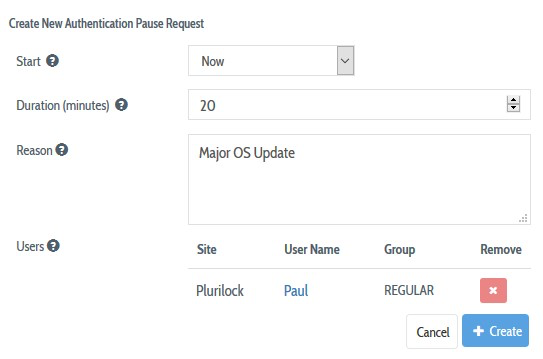
1. Visit Continuous Authentication → Accounts and select the user(s) whose accounts you want to pause, then press the Pause Protection button.

2. Fill in the pause request form by specifying a pause start time, duration (in minutes), and reason (for auditing records), then press the Create button.
NOTE
You can choose to pause the authentication starting from the next minute (’Now’) or to schedule the authentication pause in the future. (‘Later’).
To see a history of pause requests, visit Continuous Authentication → Accounts and click Authentication Pause Request History at the upper-right of the tool.
If a pause request has NOT come into effect yet, you can cancel a pending pause there by clicking Delete next to a scheduled pause. If a pause is already in effect but should be ended, click Info, then change the pause duration to the minimum value allowed.
During a pause period, the authentication logs will report an Unknown decision state for paused users.
Creating Reports
To generate reports on DEFEND's authentication decision flow, visit Continuous Authentication → Reports and click New Report button. DEFEND will prompt for a report name, date range, and site.
Click Create to run the report and cause DEFEND to extract all matching continuous authentication log data from the database, tabulate it, and output this tabulation in CSV format.
Table of Contents
- Front Matter
- Trademarks
- Copyrights
- License Conditions
- Disclaimer
- Contact
- Background
- Plurilock DEFEND Platform
- DEFEND Architecture Details
- First Login to the Admin Console
- Creating a Continuous Authentication Site
- Configuring Services
- Configuring Email Service
- Configuring Out-of-band (OOB) Notifications
- Configuring SMS Notifications
- Configuring Authy (Push Notifications)
- Configuring Health Notifications
- Configuring Identity Providers
- Configuring Webhooks
- Webhook Data Format
- Creating and Managing Administration Console Users
- Creating an Administrator Account
- Editing Your Own Admin Account
- Managing Administrator Roles and Permissions
- Continuous Authentication
- Overview
- Deploying Users
- Managing Continuous Authentication Behavior and Enforcement
- Creating and Configuring Groups
- Group Engine and Policy Settings — Application Rules
- Group Engine and Policy Settings — Biometrics
- Group Engine and Policy Settings — Enforcement
- Group Engine and Policy Settings — Data Deletion
- Moving Users Between Groups
- Managing User Biometric Profiles
- Monitoring Alerts
- Using Continuous Authentication Logs
- Understanding Risk Levels and Log Outcomes
- Automated Engine Training
- System Dashboard
- System Audit Logging and Appendices
- Checking the System Log
- APPENDIX 1: Configuring SMS Notification Service
- APPENDIX 2: Configuring Push Notification Service
Was this article helpful?
That’s Great!
Thank you for your feedback
Sorry! We couldn't be helpful
Thank you for your feedback
Feedback sent
We appreciate your effort and will try to fix the article