Jump to: Windows Agent Installation | Windows Agent Update | Windows Agent Uninstallation | Mass Deployment
Windows Agent Installation
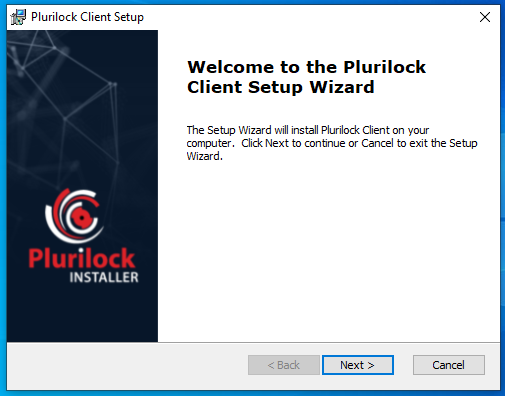
Double click on the installation file to run the installation. In the new window, click Next.
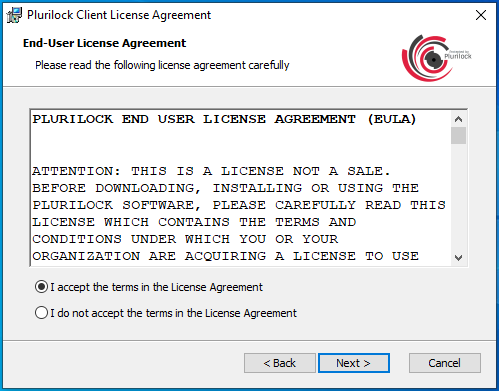
Review the License Agreement, select I accept the terms and click Next.
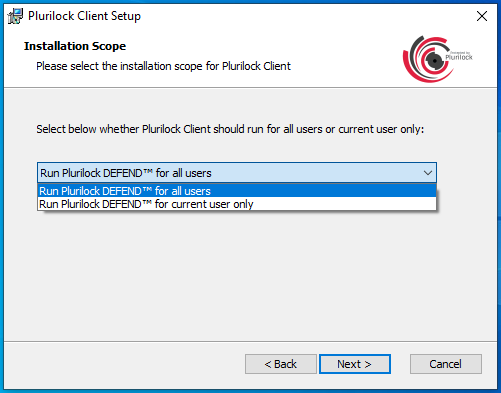
- Specify in the drop-down whether Plurilock DEFEND should be installed for all users on the system or only the current user, and then click Next.
Specify the Registration URL (Plurilock Server URL), port number, and Site Master Key. Then click Next.

Tip 1: Select 'Enable Systray Icon' if you want the Plurilock agent to be visible, including enrollment progress. Selecting 'Disable Systray Icon' will make the Plurilock agent invisible. More information regarding the Systray Icon can be found here.
Tip 2: Select 'Save profile on uninstall' if you want to save the registered profile when the Plurilock DEFEND agent is un-installed/re-installed.NOTE
The default format of registration URL is:- https://yourcompany.plurihost.com/webservice.
- The default port is 443.
- The URL, port, and master key will be provided to you by Plurilock.
Click Install to begin the installation.

NOTE
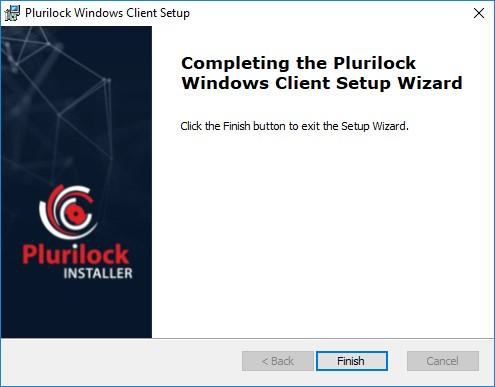
On Windows endpoints, the 'User Access Control' service may ask if you want to allow the program to install software on the computer. Provide the admin password and click Yes.If no errors are encountered, you will get the message that the installation is successfully completed. Click Finish.
To install the Plurilock Windows agent on multiple machines, use the Windows agent Mass Deployment script (see Mass Deployment section of this manual for more information).
Windows Agent Update
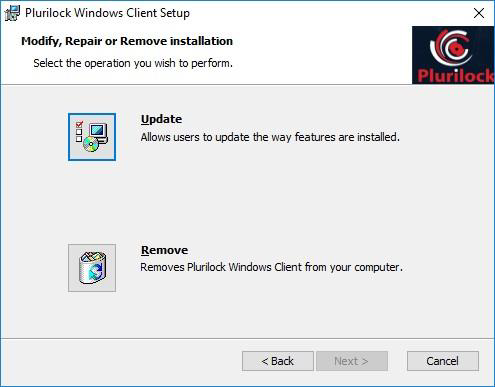
To update the Plurilock Windows agent to a new version, double click on the new installation file to run the installation process. Go through the standard installation steps until you reach the Modify, Repair, or Remove Installation page.
Here you have two options: to uninstall the agent OR to update it to a new version. Choose Update to update the agent. You do not need to provide any additional information. On the next page, click Install to start the update process.
NOTE
During the update process, Windows may inform you that the Plurilock agent is still running. Click Ignore to skip this message and continue the update process.
Windows Agent Uninstallation
To uninstall the Plurilock agent on Windows using the Control Panel:
Go to Control Panel → Programs → Programs and Features.
You will see the list of all programs installed on your machine. Find the Plurilock agent on the list.
Left-click on the agent once and click the Uninstall button.
To uninstall the Plurilock agent using the agent installer:
Double click on the agent installer.
Go through the standard installation steps until you reach the Modify, Repair, or Remove Installation page. Select Remove and click Next.
On the next page, click on Remove to start the uninstallation process.
NOTE
During the uninstallation process, Windows might inform you that the Plurilock agent is still running. Click Ignore to skip this message and continue the uninstallation process.
Mass Deployment
You can use the Plurilock agent MSI file (64-bit) for bulk deployment of the agents to select users or computers. System administrators can use the MSI file to remotely deploy the Plurilock endpoint agents so that the users do not have to manually download and configure the agents.
NOTE
When deployed on a machine, the agent will auto launch for all users who log in to that machine.
You can install the agent by running the msiexec command or use the PlurilockSilentInstaller script that goes with the agent.
To install the agent from a Command Line:
Start the Command Line as Administrator
Run the windows installer package:
msiexec.exe /i <installer.msi> REGSERVERHOST=<https://example.domain.com> REGSERVERPORT=<1234> SITEMASTERKEY=<Master Key> SHOWHIDEICON=<1 or 0> [/L <LogFile>] [/promptrestart | /forcerestart | /norestart]
| Item Description | Description |
| /i <installer.msi> | Specify the full path to the Plurilock agent MSI file. |
| REGSERVERHOST= | Specify the Plurilock Server URL in the following format example.domain.com. |
| REGSERVERPORT= | Specify the port of the Plurilock WebService (9090 by default). |
| SITEMASTERKEY= | Specify the master key. |
| SHOWHIDEICON= | Specify 0 for no (hidden) system tray icon or 1 for visible icon. |
| (optional) /L <LogFile> | Add this flag to write logging data to the provided path. |
| /norestart | Prevent the endpoint from restarting the OS following installation. |
| /forcerestart | Force endpoint OS to restart following installation. |
| /promptrestart | Prompt the user about restarting the endpoint OS following installation. |
To install the agent with the PlurilockSilentInstaller script:
Populate the fields in the CONFIG section of the script PlurilockSilentInstaller.ps1. Use the table above as a reference.
Open the Power Shell as Administrator and run the script:
| ./PlurilockSilentInstaller.ps1
NOTE
Make sure the Plurilock agent MSI file is unblocked before attempting to deploy the agent via script. The Unblock-File command lets you to run files that were downloaded from the Internet:
Unblock-File -Path ./installer.msi
Table of Contents
- Front Matter
- Trademarks
- Copyrights
- License Conditions
- Disclaimer
- Contact
- General Information
- The Endpoint Agent
- Plurilock Agent Requirements
- The Plurilock Windows Agent
- Windows Agent Installation
- Windows Agent Update
- Windows Agent Uninstallation
- Mass Deployment
- The Plurilock macOS Agent
- macOS Agent Installation
- macOS Agent Update
- macOS Agent Uninstallation
- User Enrollment
- Agent Systray Icon
Was this article helpful?
That’s Great!
Thank you for your feedback
Sorry! We couldn't be helpful
Thank you for your feedback
Feedback sent
We appreciate your effort and will try to fix the article